This guide walks you through how to navigate the Marketing Compliance Risk Rules dashboard, find rules using search and filters, understand rule details, and submit change requests.
Table of Contents
Navigating to the Dashboard
Marketing Compliance Risk Rules is located in the Admin area of IntelligenceBank and is available to Admin users.
| 1Open Admin | In the top navigation bar, click Admin. |
| 2Select Risk Rules | Select the Risk Rules tab from the menu. |
| 3View the dashboard | The Marketing Compliance Risk Rules dashboard loads, displaying all compliance rules configured for your platform. |
Understanding the Rule Table
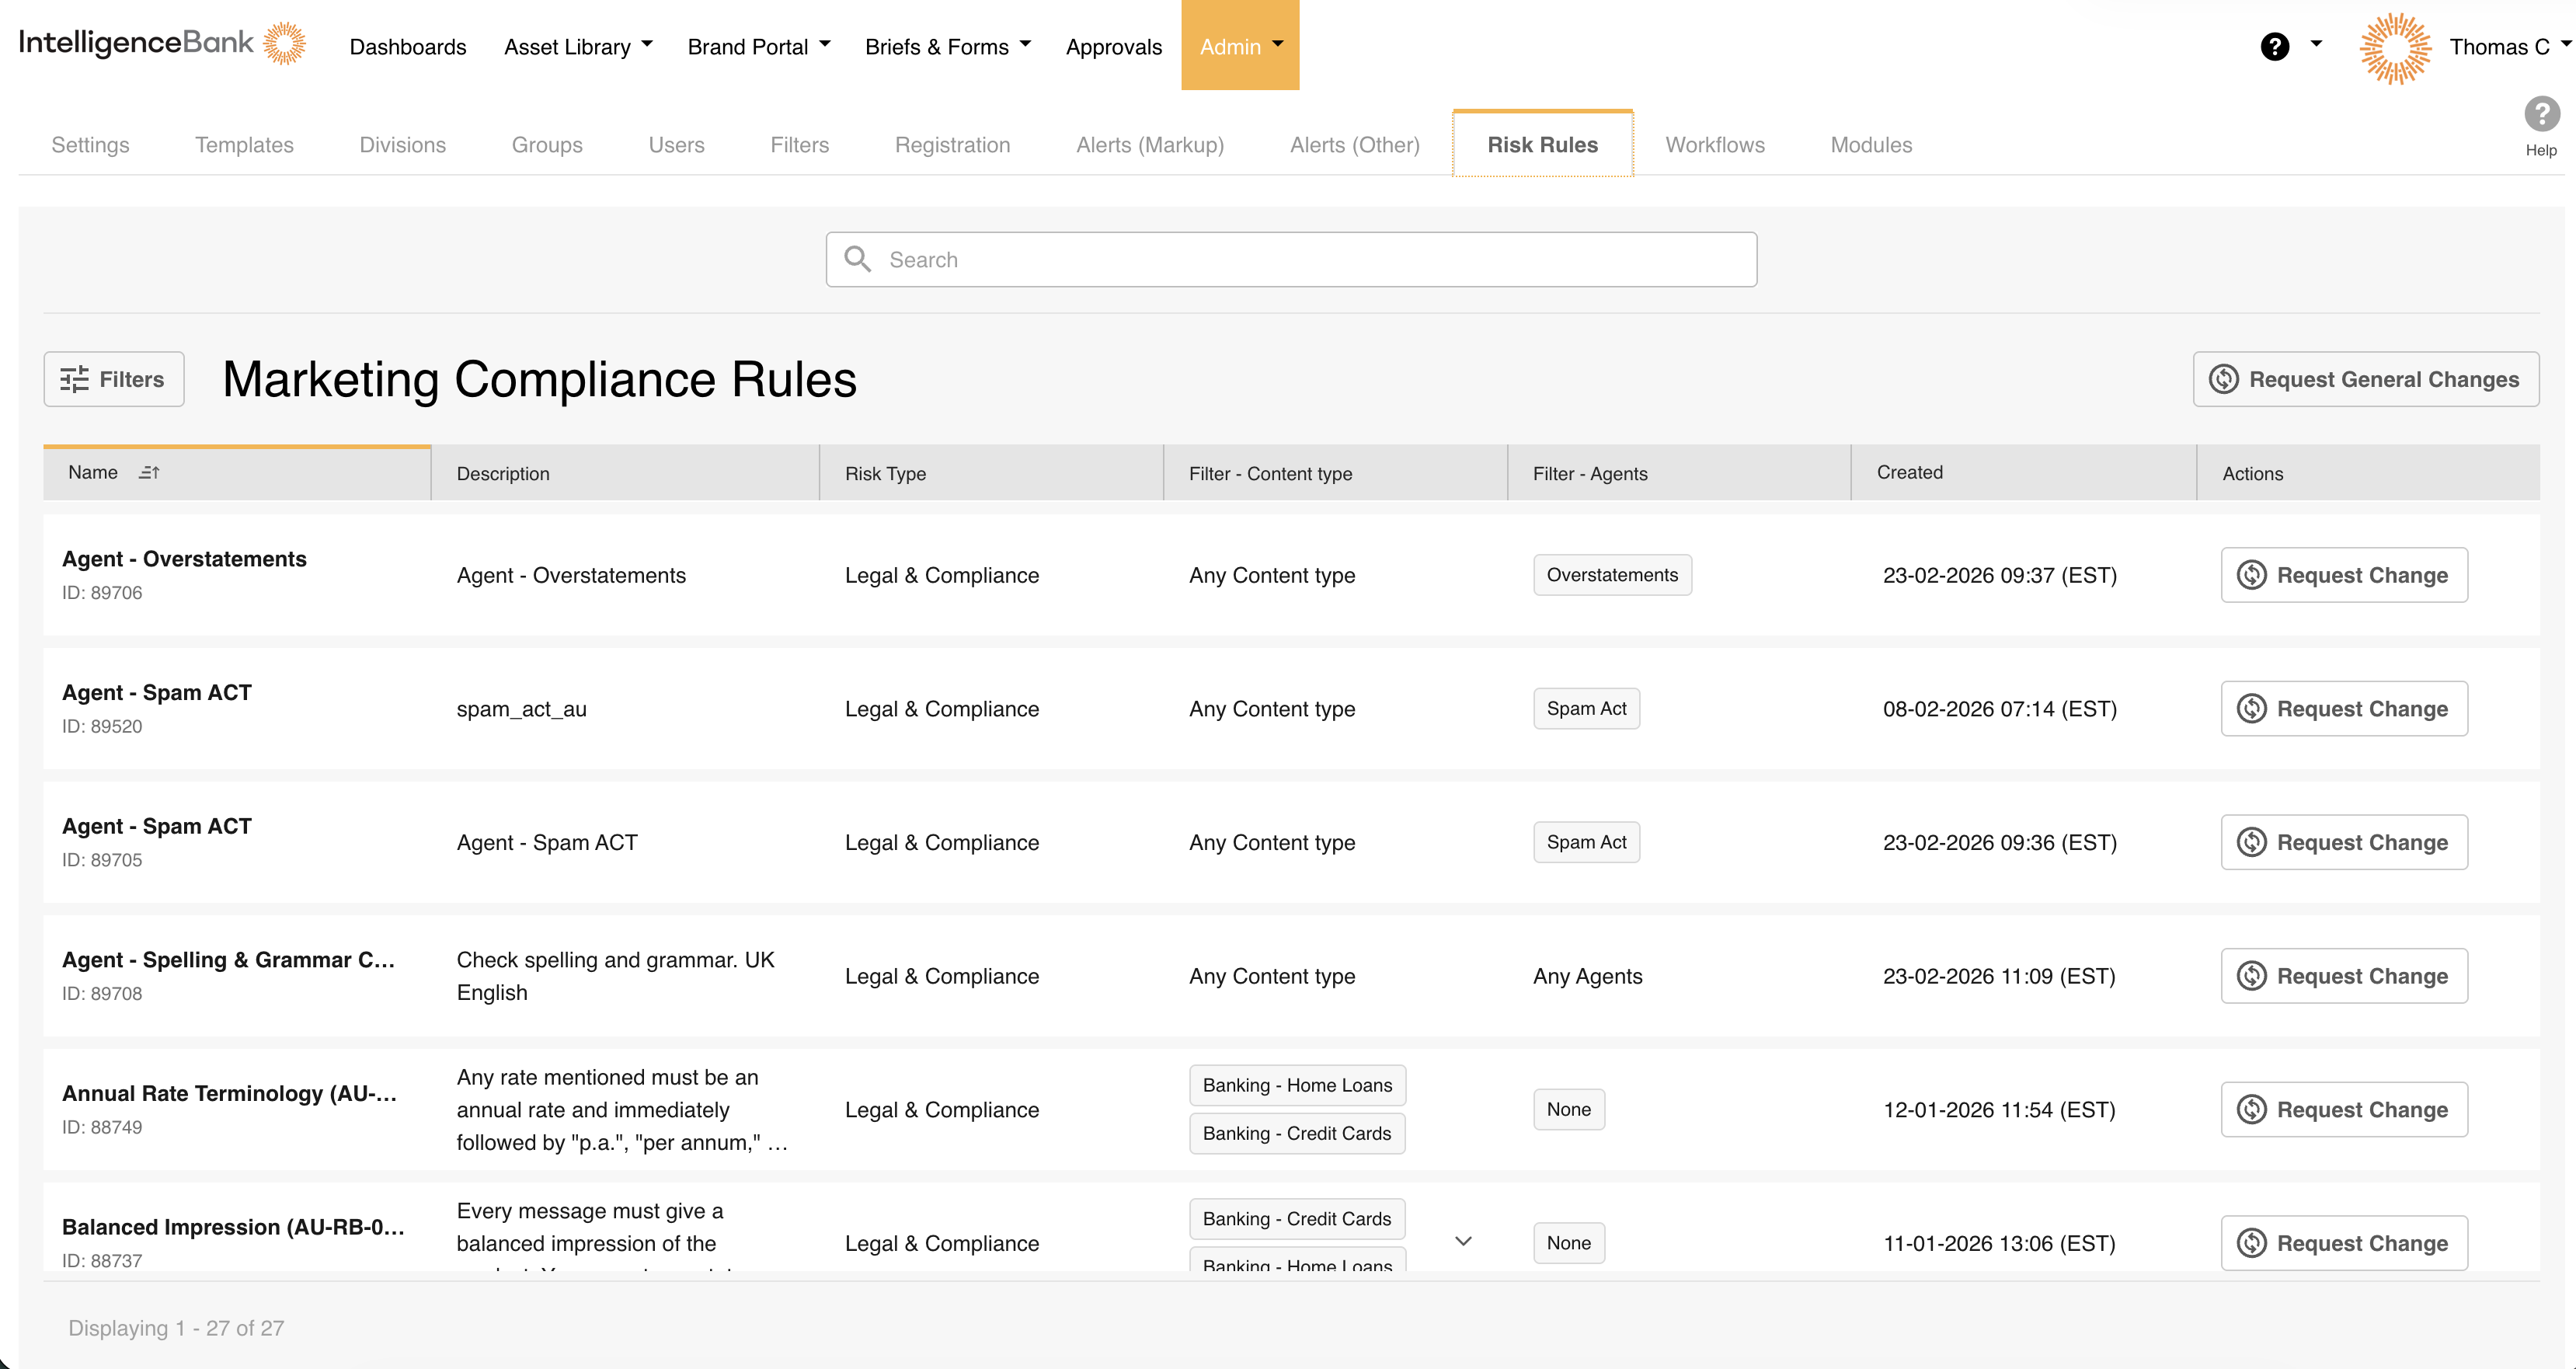
The dashboard displays all your compliance rules in a paginated table. Each row represents a rule, and the table includes the following columns:
| Column | What It Shows |
|---|---|
| Name | The rule name, with its unique ID displayed below the name. |
| Description | A summary of what the rule checks for. |
| Risk Type | The category of risk the rule addresses, for example Legal & Compliance or Brand. |
| Risk Categories | The platform-configurable filter values that determine when this rule applies, such as channel, market, products, state, document type, or approval process. These categories are configured specifically for your organisation and may differ from those on other platforms. |
| Created date | The date the rule was created. |
| Actions | Contains the Request Change button for submitting a change request on that rule. |
Rules are displayed in pages. The pagination control at the bottom of the table shows how many rules are currently displayed and lets you move between pages.
Searching for Rules
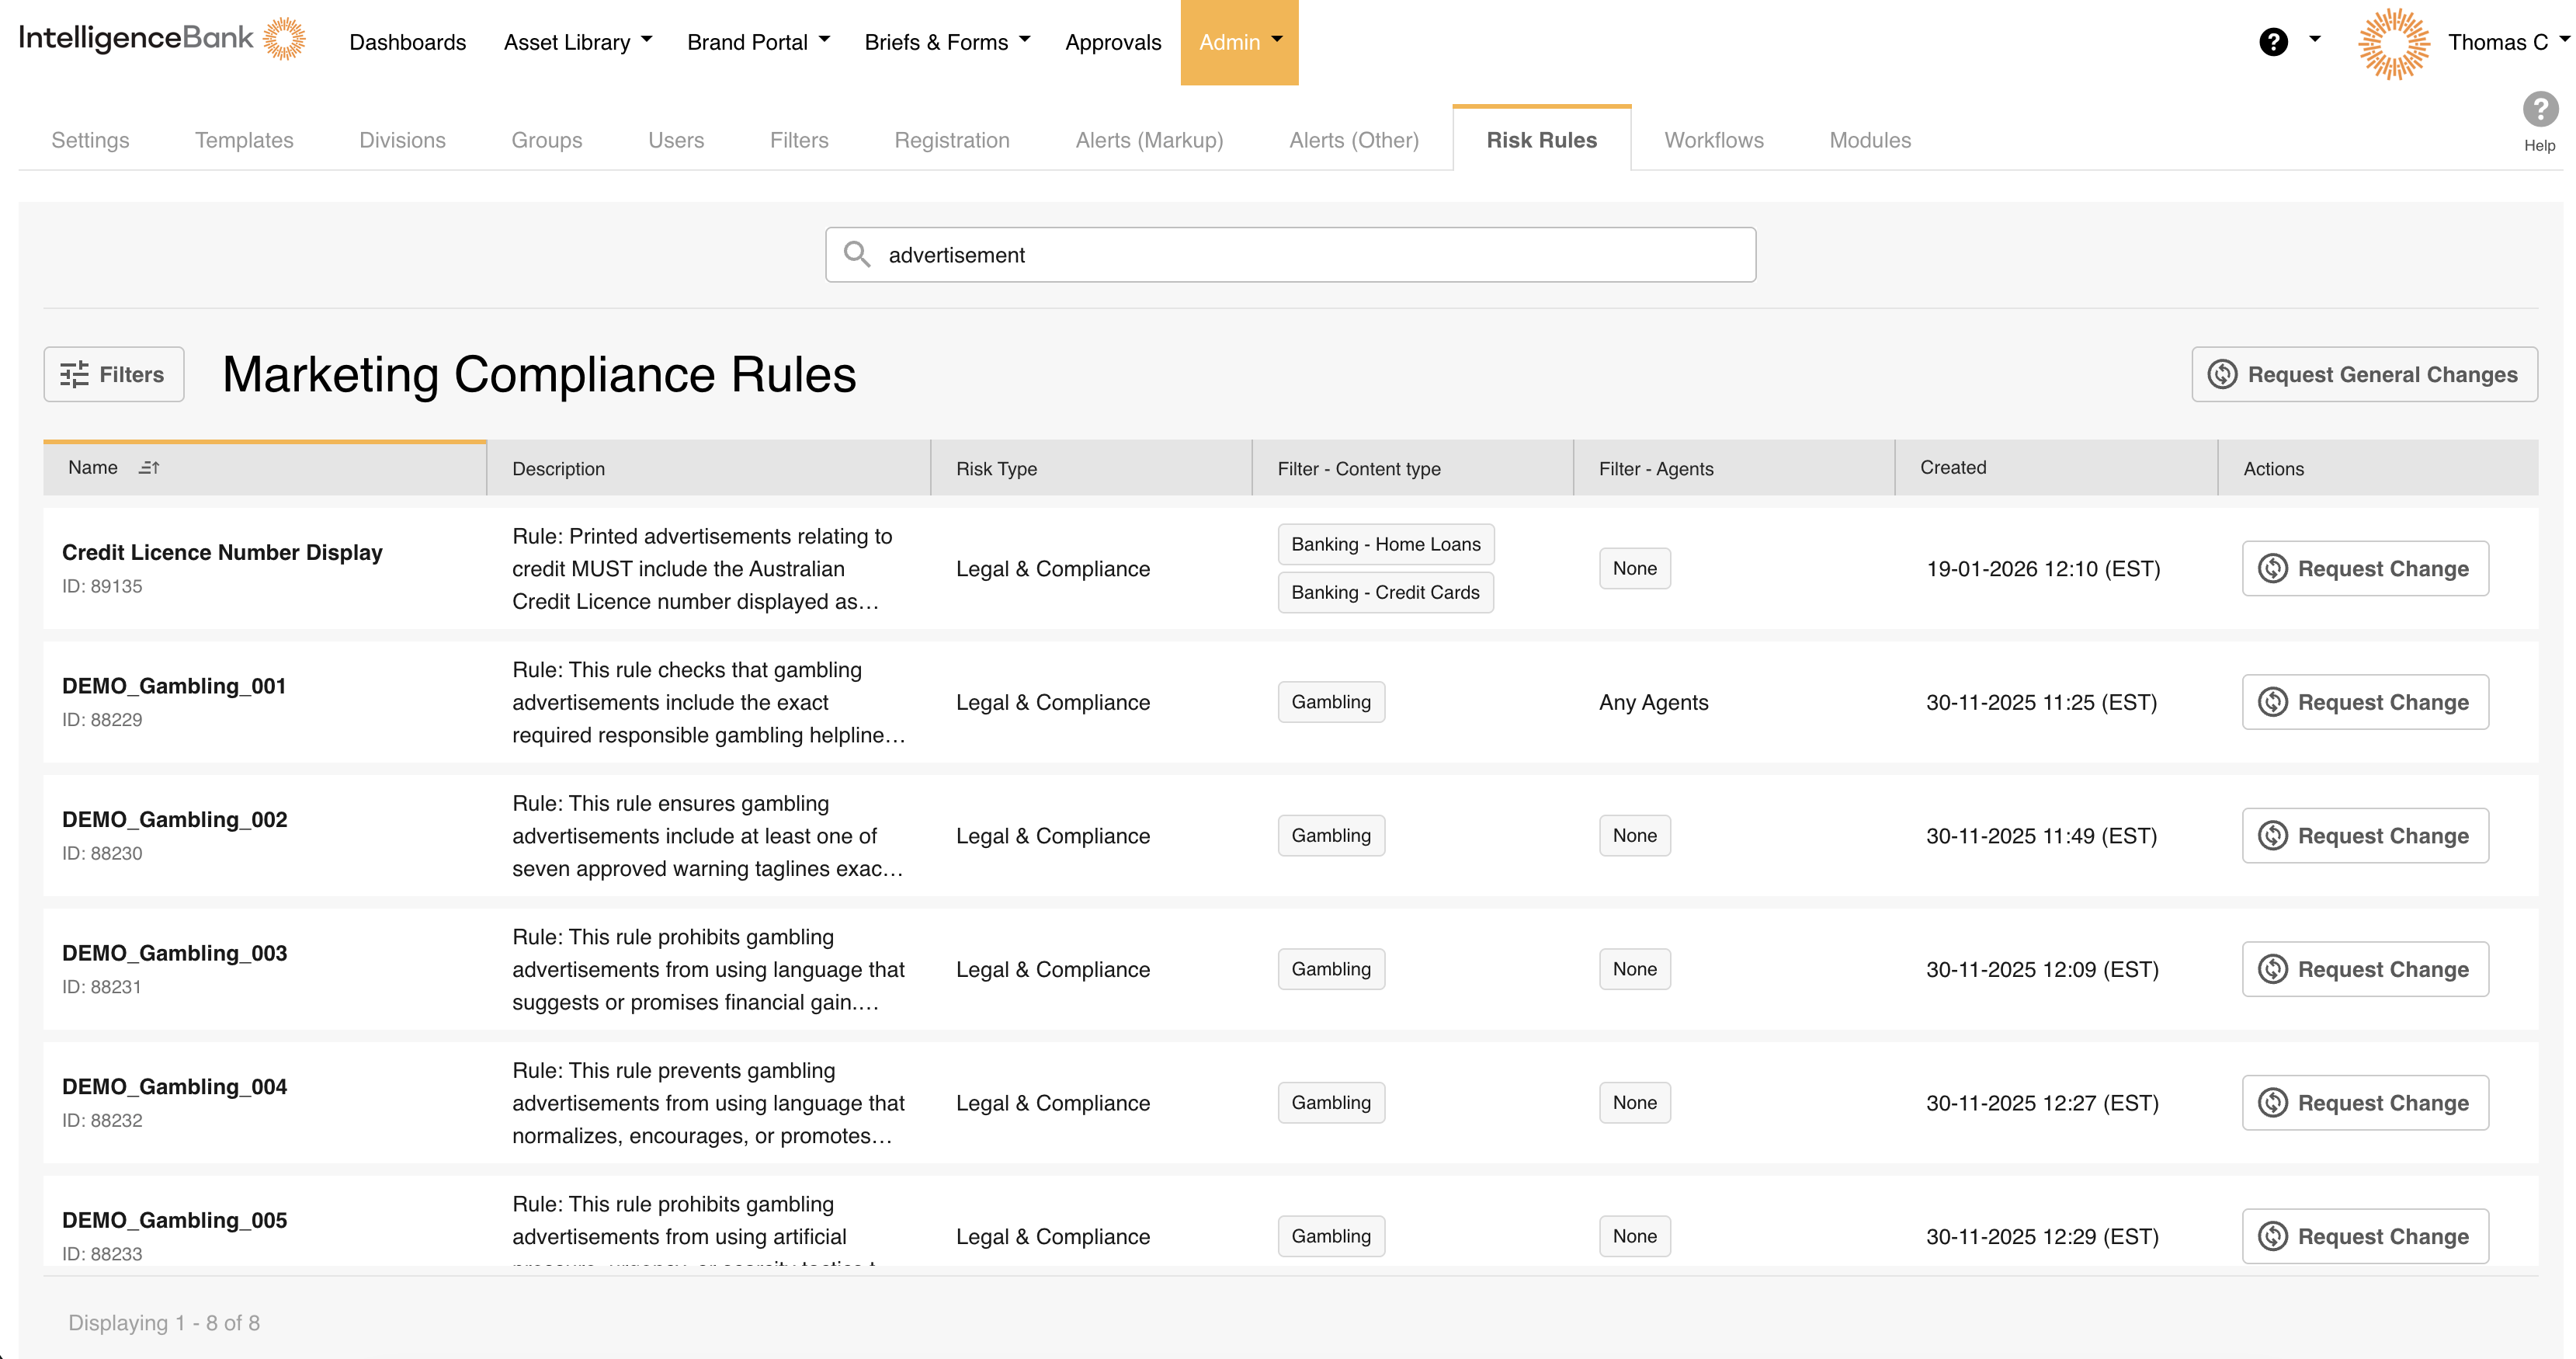
The search bar sits above the rule table. Type a keyword to find rules. The table filters in real time as you type, matching against rule names and descriptions.
For example, typing advertisement instantly narrows the table to rules whose name or description contains that word. Clearing the search field restores the full list.
Filtering Rules
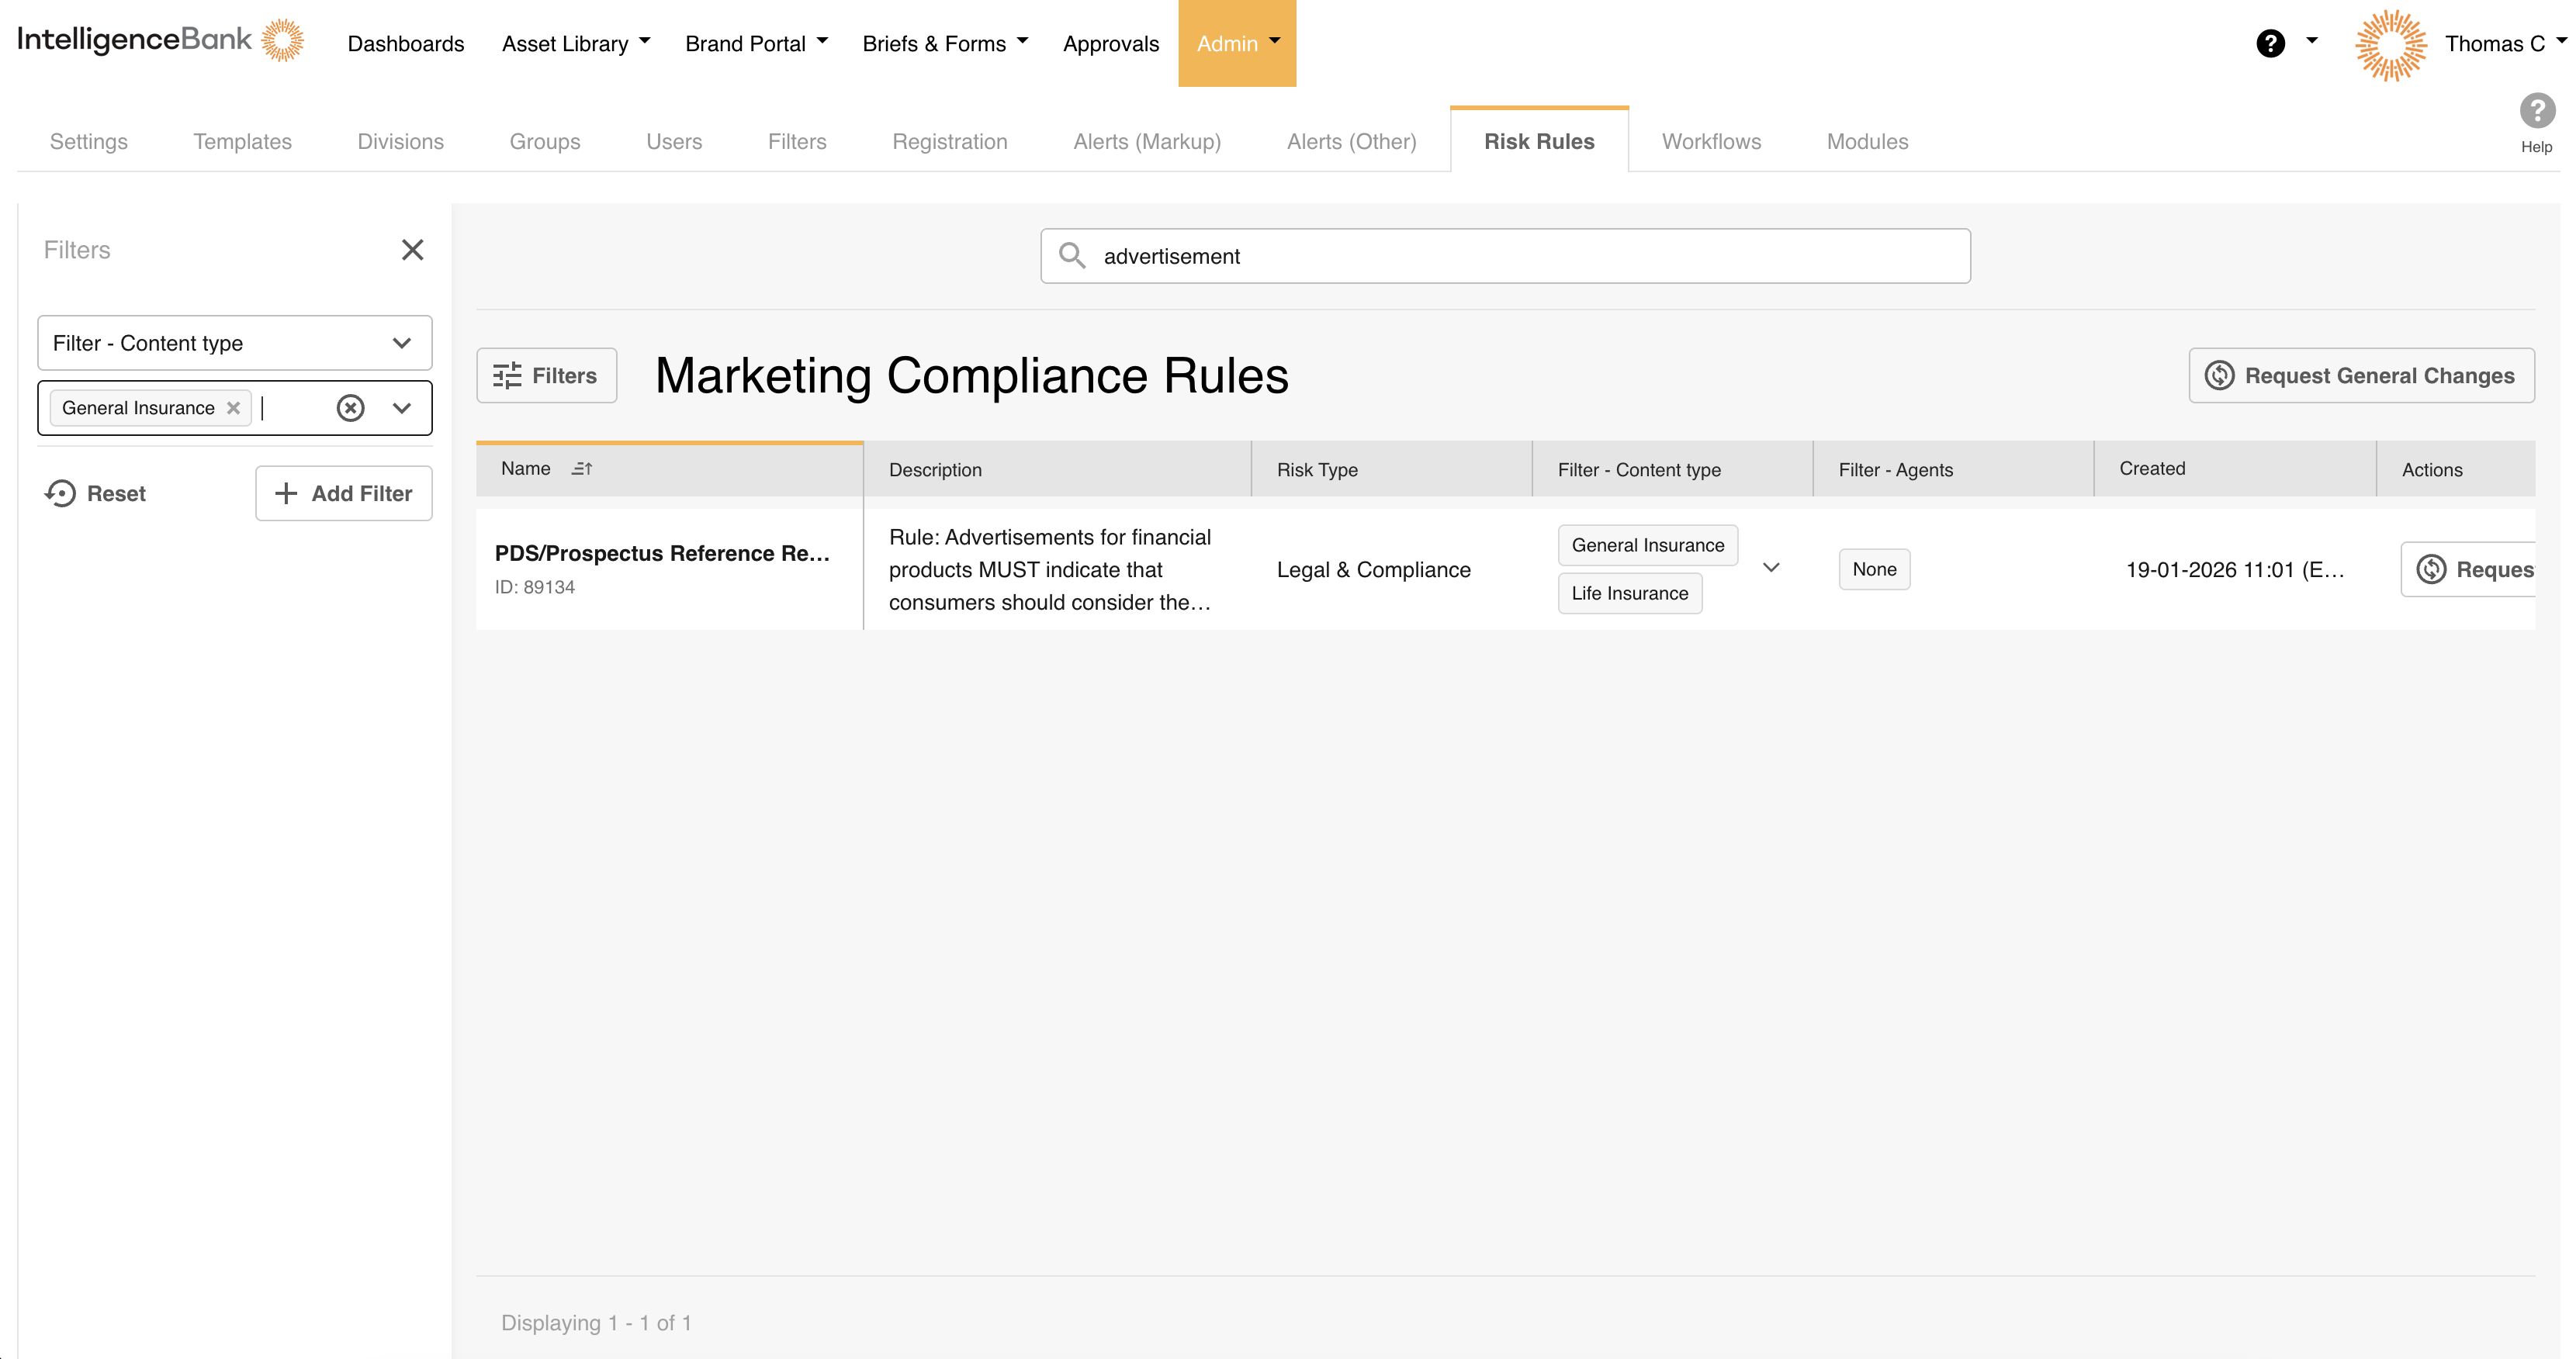
For more targeted browsing, use the Filters button to the right of the search bar. Filters let you narrow the table by Risk Type or by any of your Risk Category values, such as channel, market, products, state, document type, or approval process.
| 1Open the filter panel | Click the Filters icon. |
| 2Choose your values | Select a Risk Type value, a Risk Category value, or both. |
| 3Review the results | The table updates automatically to show only matching rules. |
| 4Clear filters | Deselect a value in the filter panel, or clear all filters to return to the full list. |
How Risk Category filtering works
Each rule is configured with specific Risk Category values. For example, a rule might be set to apply to a particular channel, or it might be configured to apply to Any channel. When you filter by a Risk Category value, the table shows rules that either match that specific value or are configured to apply to Any value in that category. This is intentional: a rule set to "Any" applies regardless of that filter, so it will always appear as relevant when you filter by that category.
When you filter by multiple values within the same Risk Category, the table only shows rules that belong to all of the values you selected, or that apply to Any value in that category.
You can combine search and filters to narrow results further. For example, you could search for "advertisement" while also filtering by a specific content type.
Viewing Rule Details
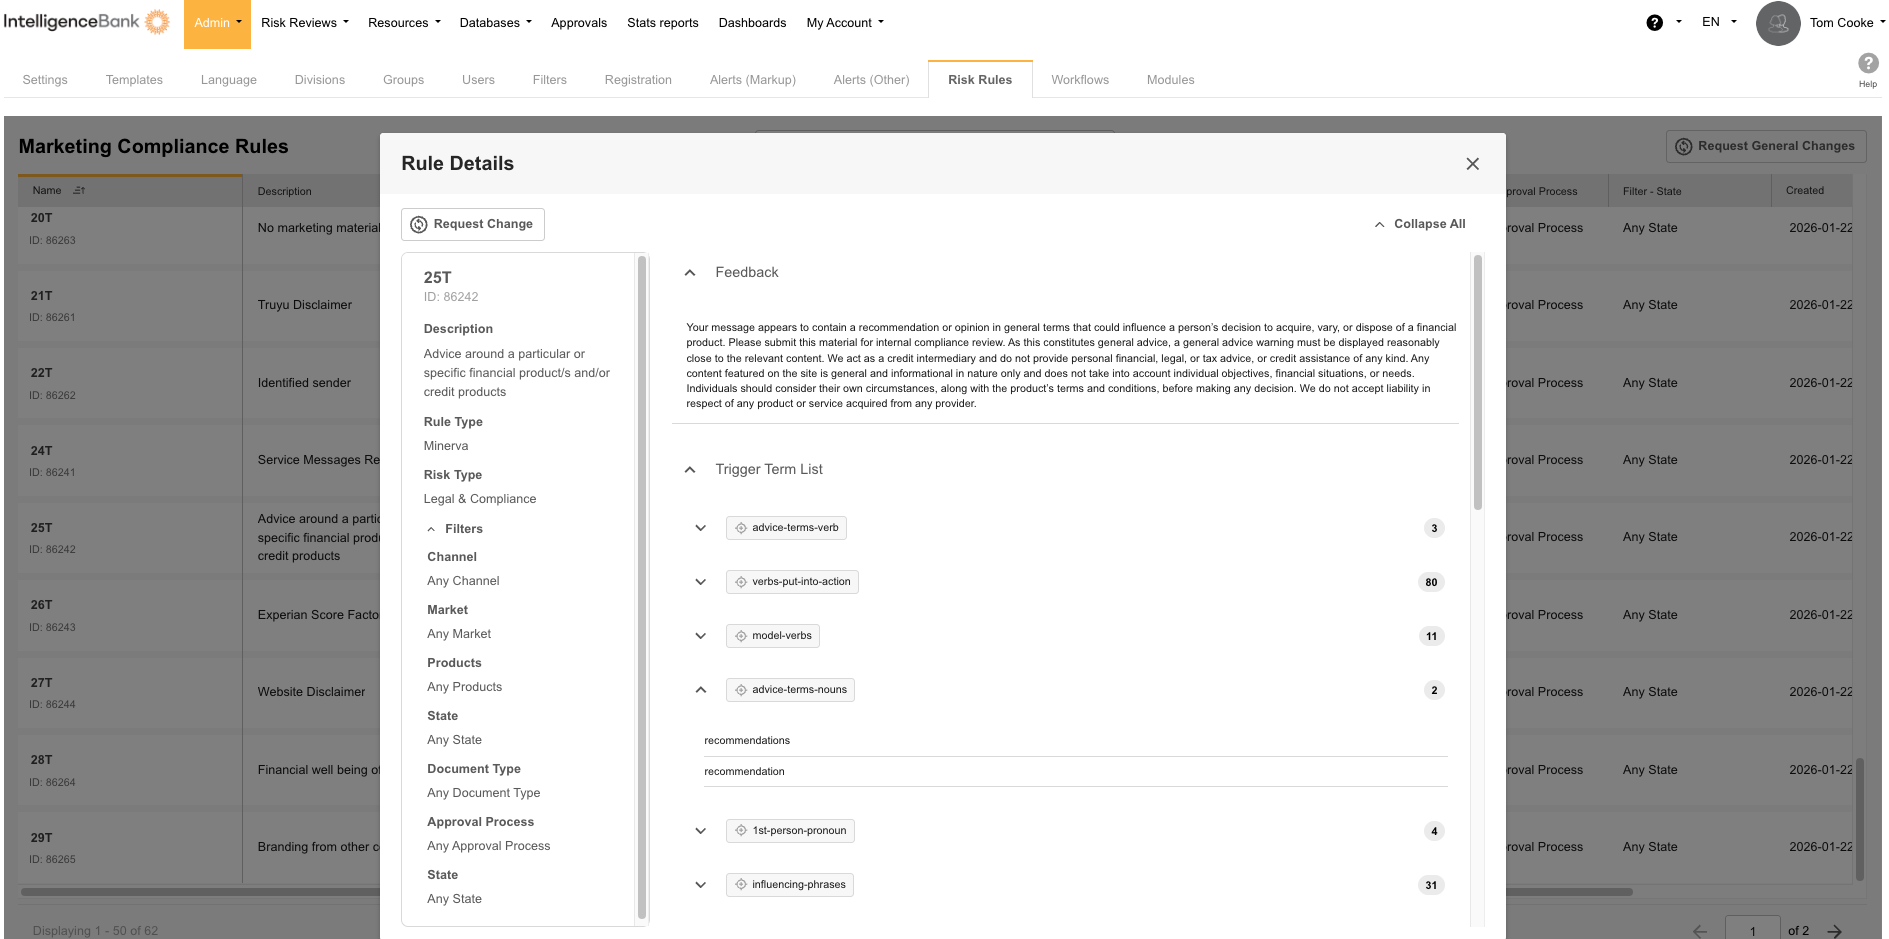
To see the full details of any rule, click its row in the table. This opens the rule detail panel on the right side of the screen, which gives a complete breakdown of the rule:
| Section | What It Shows |
|---|---|
| Rule name and ID | The rule's display name and its unique identifier. |
| Description | What the rule checks for, in plain language. |
| Rule Type | The structural type of the rule, which describes how the rule logic is built. |
| Risk Type | The risk category this rule addresses, for example Legal & Compliance or Brand. |
| Filters | The Risk Category values that control when this rule is applied, such as channel, market, products, state, document type, and approval process. A value of "Any" means the rule applies regardless of what is selected for that category. |
| Feedback | The message shown to a reviewer inside IntelligenceBank when this rule fires on their content. This is the guidance they see explaining what was flagged and why. |
| Trigger Term List | The specific terms or phrases that cause this rule to flag content when detected. |
| Proximity Term List | Terms that must appear near a trigger term for the rule to fire. These define an inclusionary relationship: the rule activates when a trigger term and a proximity term appear close together. |
| Exception Term List | Terms that prevent the rule from firing when present near a trigger term. These define an exclusionary relationship: if an exception term appears alongside the trigger, the rule will not flag the content. |
| Absent Term List | Terms that, if found anywhere in the document, cause the rule not to apply at all. For example, if a document already contains a required disclaimer, a rule checking for that disclaimer would be excluded. |
| Disclaimers | Any required disclaimer text associated with this rule. These are the specific statements that must appear in content when the rule conditions are met. |
Not every section is populated for every rule. If a section is missing, that component isn't part of how that particular rule works. For example, a rule with no trigger terms won't show a Trigger Term List in its detail panel.
Use Collapse all at the top of the panel to collapse all sections, then expand only the ones you need. Click the ✕ to close the panel and return to the full table.
Requesting a Change to a Specific Rule
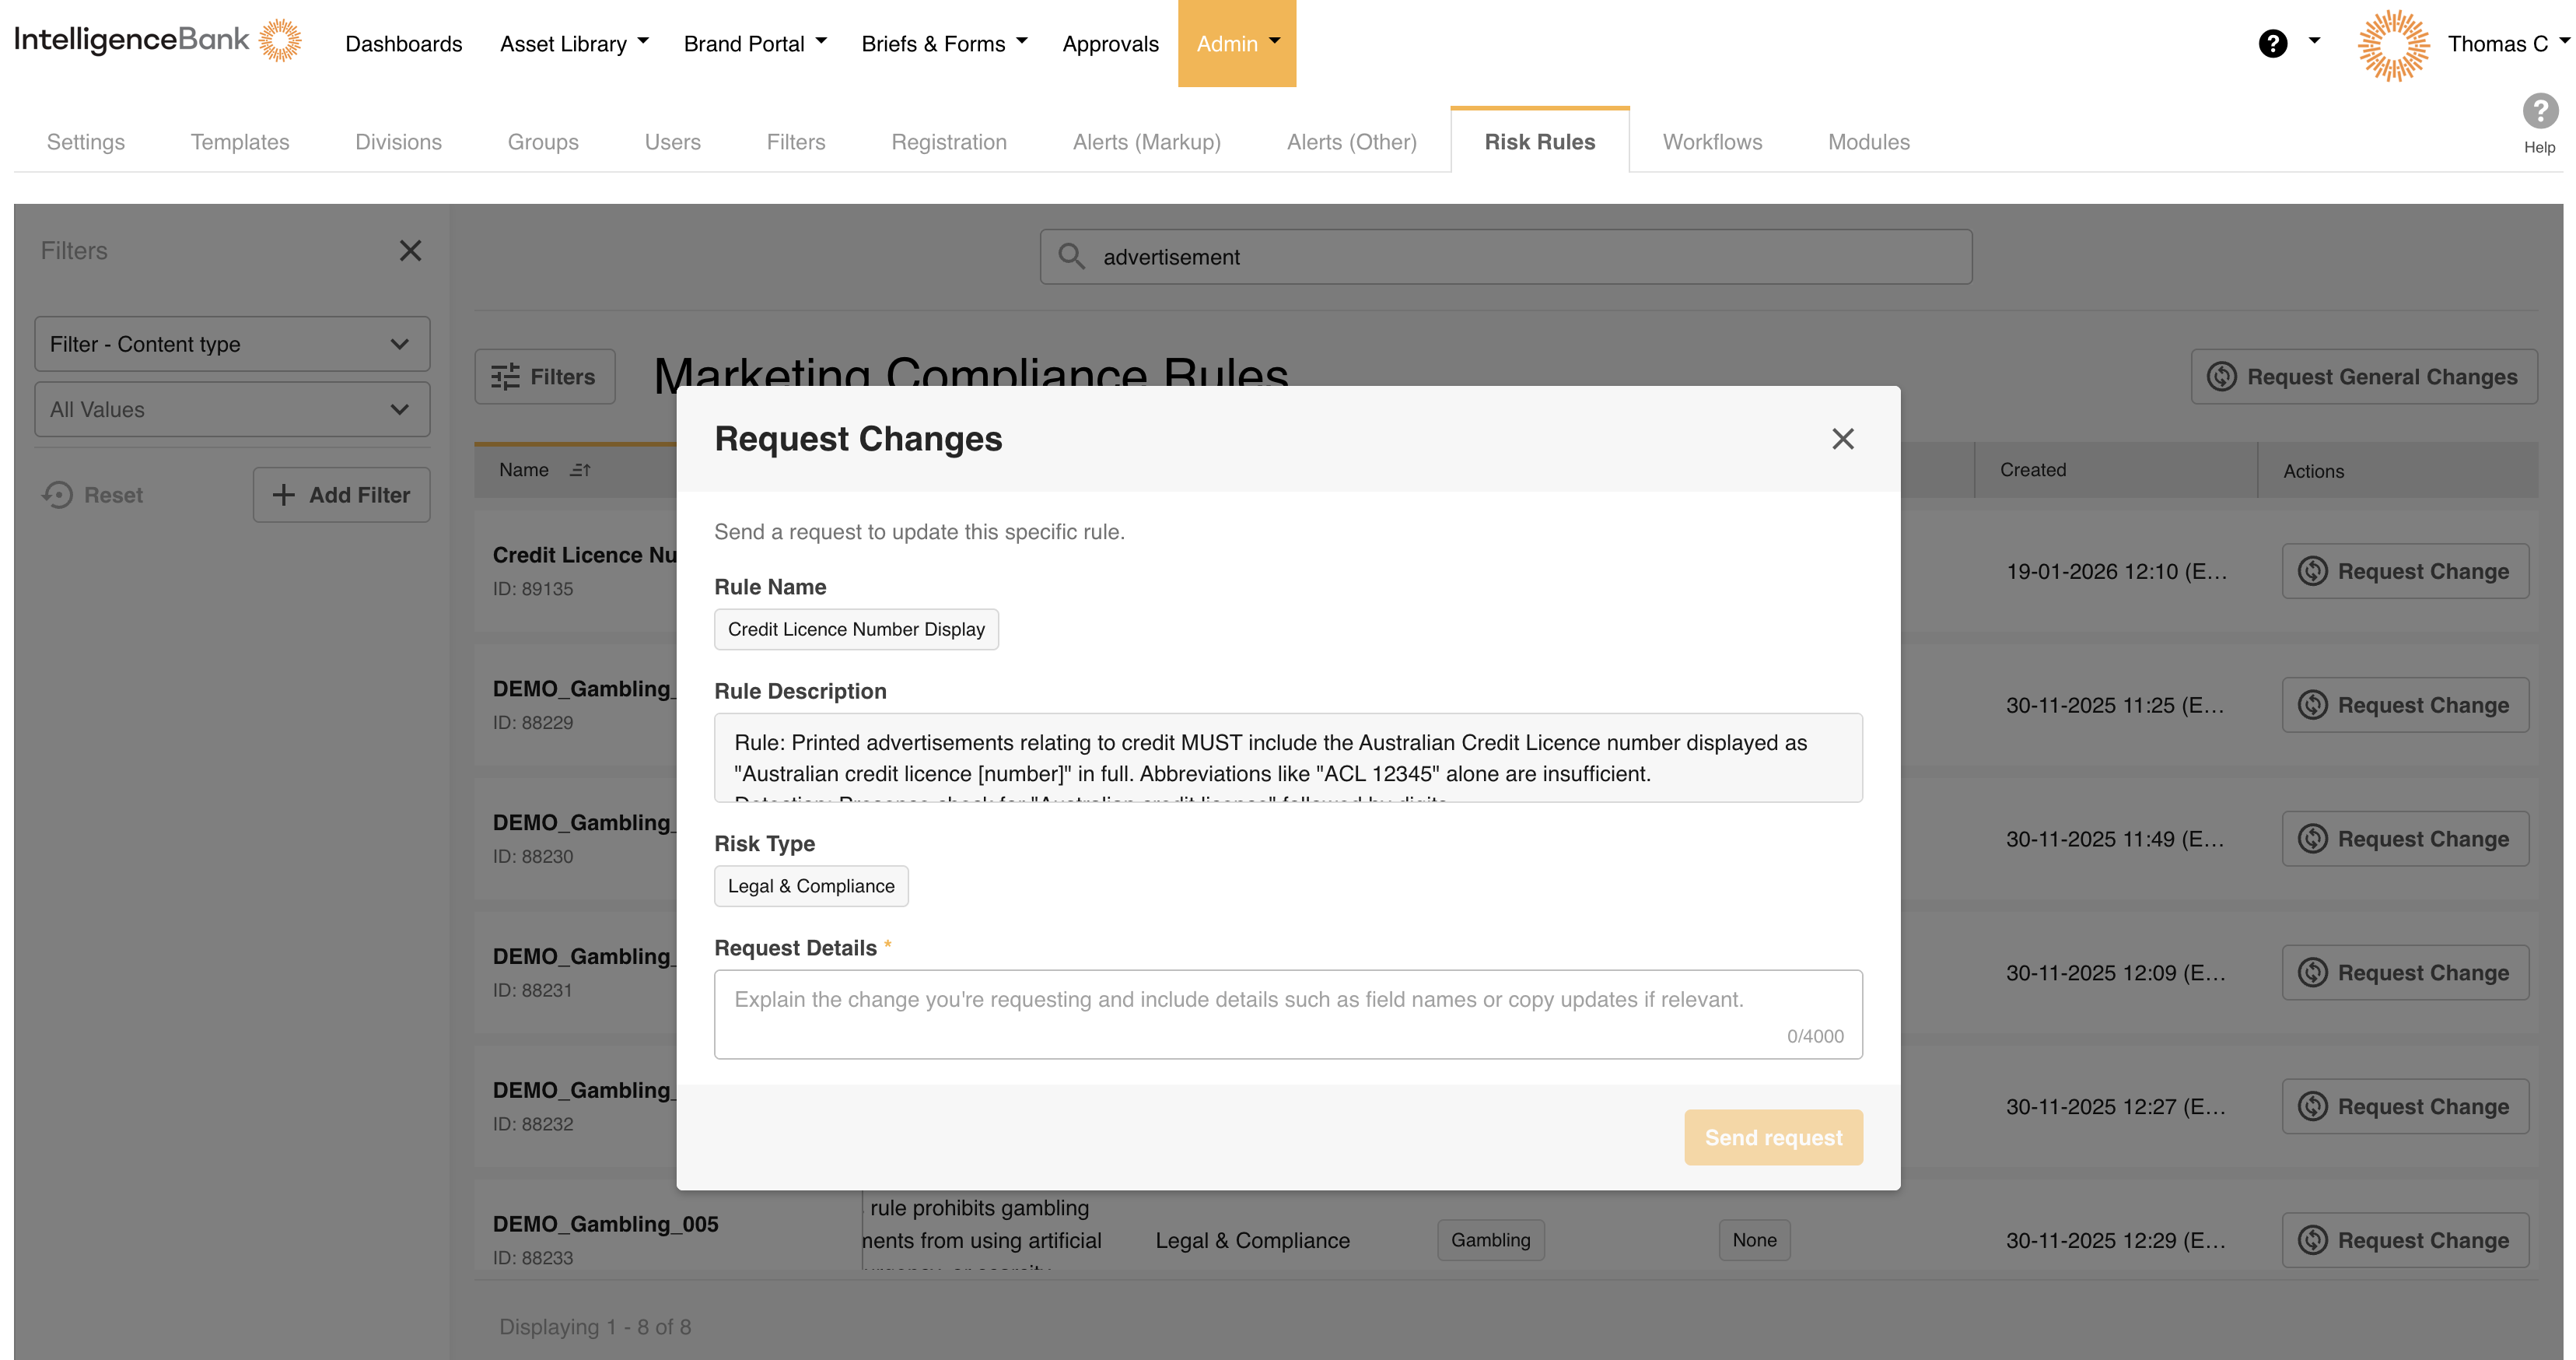
Rules cannot be edited directly in the dashboard. All changes are made by the IntelligenceBank rules team to keep your compliance logic accurate and intact. You can submit a change request in two ways.
From the rule table
| 1Find the rule | Use search or filters to find the rule you want to change. |
| 2Click Request Change | Click Request Change in the Actions column for that rule. |
| 3Review the form | The change request form opens with the rule's ID, name, description, and risk type already filled in. |
| 4Describe the change | Describe the change you need in the form. |
| 5Submit | Submit the form. Your request goes directly to the IntelligenceBank rules team, who will follow up with you. |
From the rule detail panel
| 1Open the rule | Click a rule row to open the detail panel. |
| 2Click Request Change | Click Request Change at the top of the panel. |
| 3Submit | Complete and submit the form as above. |
Requesting a New Rule or Changes Across Multiple Rules
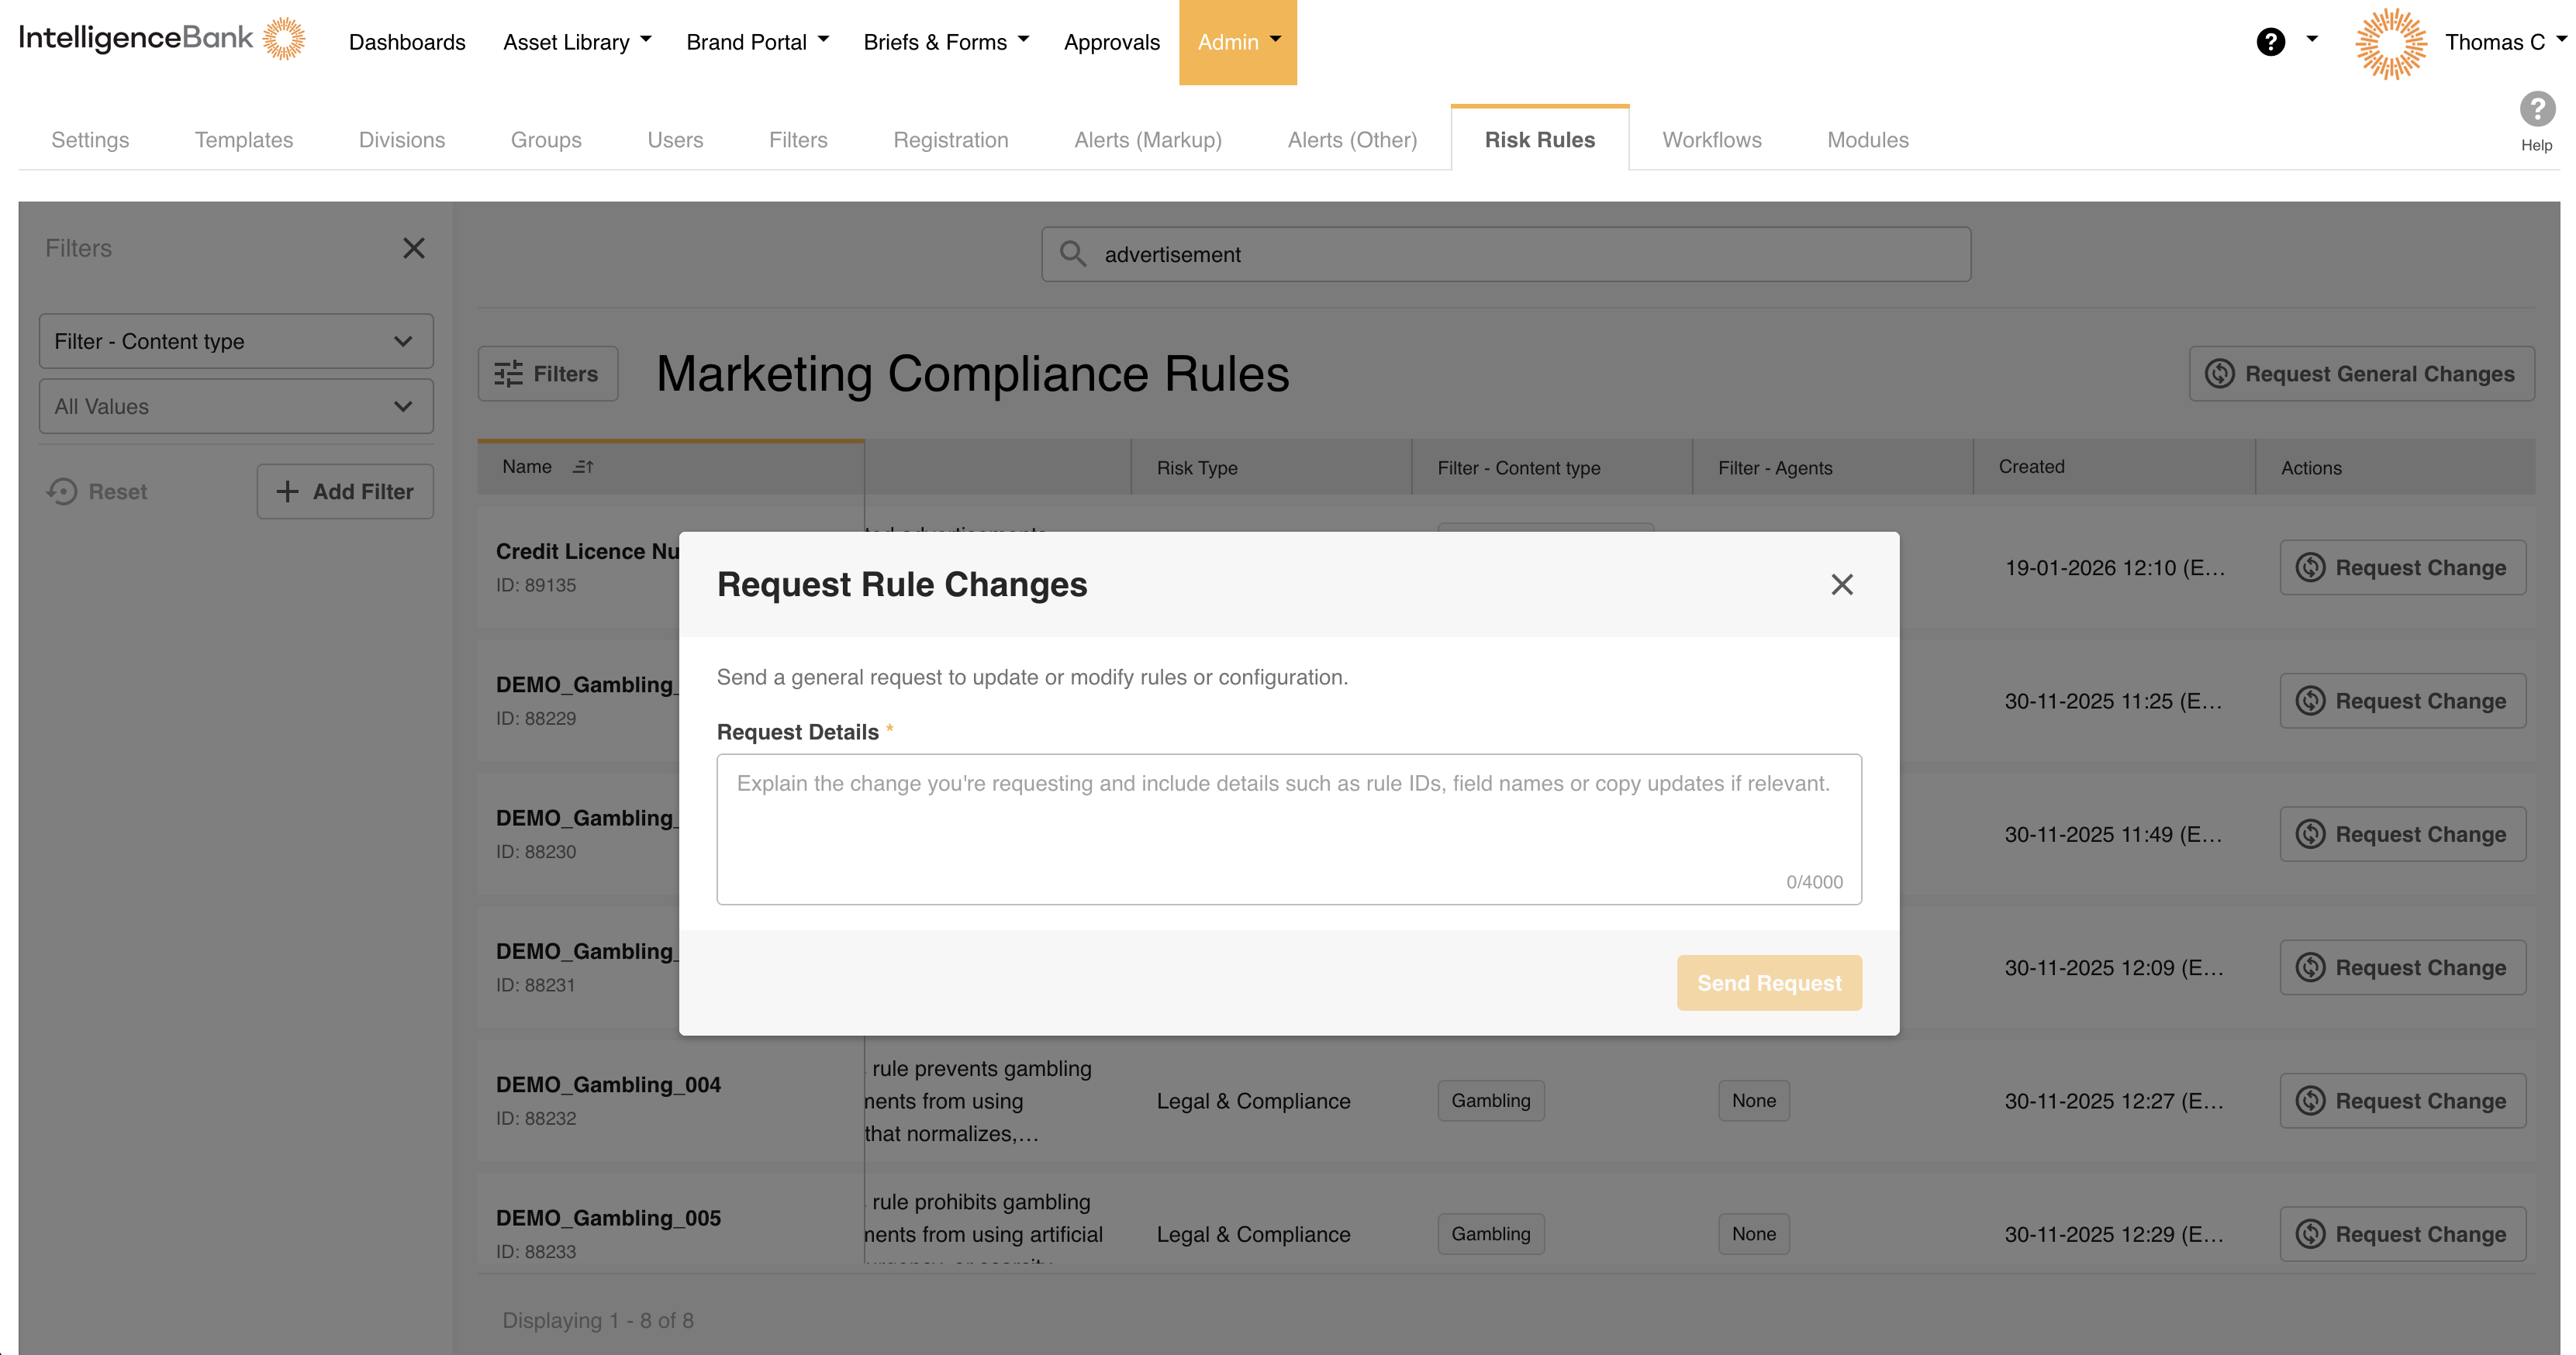
If your request isn't tied to a single existing rule (for example, you want to add a new rule, remove a rule entirely, or make a change that affects several rules at once), use the Request General Changes button. It sits above the rule table, to the right of the search bar.
| 1Click Request General Changes | Click Request General Changes above the rule table. |
| 2Describe your request | Include as much detail as possible about the change you need. |
| 3Submit | Submit the form. Your request goes to the IntelligenceBank rules team, who will follow up with you. |
Need Help?
For questions about advanced configuration options, contact your platform Admin or email support@intelligencebank.com.
Contact SupportWas this article helpful?
That’s Great!
Thank you for your feedback
Sorry! We couldn't be helpful
Thank you for your feedback
Feedback sent
We appreciate your effort and will try to fix the article